I used to make my own soap and then they stopped selling Red Devil Lye in the stores here and I just haven't found an alternative. The other day I saw an auction on a forum I am on for goat's milk soap so I checked out this person's website. It had some really nice soap on it and one really caught my eye because it said it was a shampoo bar. How interesting! I ordered a shampoo bar for $6.
http://www.witchsbrewsoaps.com/shampoos.html
The bar came in yesterday. It didn't really look like the bars on the website. Not nearly as clear and no pretty design on it. I didn't like that. Not that I think the design matters but I just think you sell the product you have advertised. The smell also didn't seem all that nice - lemon/lavender.
Today I got to try the bar. Wow! What wonderful lather! Better than my store bought shampoo by a long shot. And the smell? It has the lightest most lovely scent. I hope it lasts a while because $6 for me is a lot for shampoo but I am definitely wanting more of it! I have got to see about getting more lye and making this bar myself.
Friday, September 30, 2011
Thursday, September 29, 2011
In Today's News
Eleven more quail chicks hatched but we lost two already. The duckling is loving it. I also had another bantam mille fluer Japanese chick hatch.
One of the quail out in the breeders pen laid me a green egg today:

One of the quail out in the breeders pen laid me a green egg today:

While unusual (I have never gotten one before) I don't think this is anything special. With birds eggs are a base color (often white or blue) and the outside color of the egg is produced by the female bird and laid over the base color. When you crack a corturnix quail egg they are light blue inside because that is the base color. This egg was produced by a hen that just wasn't quite ready.
Found another baby snake in my sink yesterday morning but none (thankfully) showed up today.
I got the day off yesterday when the brakes went out on my car, while I was driving it home, of course. I did manage to get it to the house without incident (or accident). Phil and my brother were able to fix it today by putting a new wheel cylinder on one of the back wheels.
I have finished crocheting the hat for my niece and am almost half way through the scarf. I like them so much I might make me some.
Tuesday, September 27, 2011
I Thought I Would Update Again
Some things just don't need their own post so they will get an "update" post.
This morning we had a hatch of 4 quail. They seem to think the smaller duckling in the brooder is "Mama" because the duckling lets them sit under it. There are only three of them in the picture, the other one was eating.


 It would be no fun if there wasn't a predator somewhere. This was in my outdoor sink. I didn't even see it until I was almost done watering everyone.
 I have been doing a little gardening too. The raised beds aren't really ready but I put my last bag of manure in this one along with the compost and went ahead and planted a few red cabbage, broccoli and green onions.

 This is the beginnings of a hat and scarf set that I am making for my niece for Christmas. I traded for the yarn online and found the pattern on another blog.
 So that is my update for this time. I have some quilting to do for Christmas and that basket to finish those will be future blog post hopefully soon.
This morning we had a hatch of 4 quail. They seem to think the smaller duckling in the brooder is "Mama" because the duckling lets them sit under it. There are only three of them in the picture, the other one was eating.

The twenty quail that were hatched several weeks ago are just about ready to butcher. There have been a couple of losses but I believe there are still eighteen of them.

This is just a pictures I took some of the older ducks this morning taking their daily bath.

This is today's egg collecting. I got my first blue egg today from an Ameraucana chick that I bought at Tractor Supply this spring.


I also moved the potted grape vine and it is recovering from the ducks eating off all its leaves.


Sunday, September 25, 2011
Making Crackers
So what do you do at 4 a.m. in the morning when you can't sleep? You make crackers..of course. I have had a couple cracker recipes printed up for a long time and have just never gotten around to trying them but since I had so much time this morning I figured I might as well try them.
One recipe looked like way too much work, but the other was a lot more simple so I chose that one (I'm not lazy it is just that it was 4 a.m. in the morning and I was ambitious but I wasn't THAT ambitious). The recipe was for sesame seed crackers and I didn't have as many sesame seeds as it called for but I felt I had enough to test out the recipe anyway. So here is the recipe:
1 C. water
3 T. oil
1 tsp. salt
2 1/2 C. flour
1/2 tsp. baking powder
1/2 C. sesame seeds (I had less than a 1/4 cup)
Mix the water, oil and salt together until the salt is dissolved. Add the flour, baking powder and seeds. Roll dough in a ball (it will be a bit sticky) and turn out on a floured surface. With a rolling pin, roll out as thin as you can get it.Prick with a fork all over. Cut with a pizza cutter (dip it in flour first)into squares or whatever shape you want.

Use a metal spatula dipped in flour to lift the squares off the board and onto a cookie sheet that you have sprinkled all over with salt. Sprinkle more salt on top of the pieces.

Bake in a 350 degree oven for 15-20 minutes (if they aren't cooked enough, they will not harden properly and become soft (you can bake them again for a few minutes if they do get soft later).

These weren't too bad but they tasted kind of plain to me. So the I made another batch and instead of sesame seeds I put in 2 tsp. onion powder. The onion powder ones were much, much better. I think garlic powder and any kind of herb would work good in them as well.
I didn't really want the plain ones to go to waste though so went looking through the cupboard and found several marked down packages of Hidden Valley Spicy Ranch dressing and in the frig was a container of sour cream so I made dip. The sesame seed crackers are quite wonderful with the dip.

Ok, time to go back to bed.
Friday, September 23, 2011
Some of the New Arrivals
I say "some" because another chicken chick just hatched in the incubator and another is pipped but these are the new arrivals from yesterday and the day before. This is an Easter egger chick and two Welsh Harlequin ducklings.


I really love ducklings!
Easter Egger chick will just be a layer. In case anyone doesn't know, they usually lay green or blue eggs. The ducks will likely be just for eggs too unless I breed a lot then the future generations may end up on the table.
Raised Beds at Work!
I believe I have mentioned that I work at the Boys and Girls Club here in Thomson. It is a great place to work if a bit challenging. This year we have over 150 children registered and about 115 come every day. Recently we got a grant to build a raised bed garden for our children which we all thought was pretty wonderful. One of our Board members got his people together and THIS is what they built for us!


I was so surprised yesterday when I went out and looked at it. Nine big beds separated into three sections each. We will have 4-5 responsible for each section. It is too bad that it is fall and not spring as we are limited in what we can grow but we are going to try.


I was so surprised yesterday when I went out and looked at it. Nine big beds separated into three sections each. We will have 4-5 responsible for each section. It is too bad that it is fall and not spring as we are limited in what we can grow but we are going to try.
Sunday, September 18, 2011
Lasagna
Just one more post for today I promise. I had to do one on the making of lasagna. It is definitely one of our favorite meals but we don't have it very often. A friend taught me how to make it long ago, a year or so after we moved to Georgia.
You need:
Lasagna noodles
spaghetti sauce
hamburger (and sausage if you want)
mozzarella cheese
ricotta cheese
Parmesan cheese
Start by browning the hamburger (and sausage). Today I did about a pound and a half of burger and a pound of hot sausage. That is a bit more than I usually do but I had it so I used it.

You then add your sauce. It normally take a bit more than 1 can or jar of sauce. I had a small jar in the freezer from the last time we used half a can so added that to this. In a pinch you can add a can of tomato sauce to make it stretch.

You let the sauce and meat simmer while you cook your lasagna noodles. I normally cook them for about 10 minutes so that they are still cooked but firm. Then you start your layers in a 9 x 13 inch pan. Excuse my stained up glass pan, I have had it for 20 years or more.
You start with a layer of 3 noodles.

Then a layer of meat and sauce.

Then you add a layer of ricotta.

Then a spread your shredded mozzarella on top of that.

Then you sprinkle the whole thing with Parmesan cheese.

You do three sets of these layers and the pan will be full. Bake at about 350 degrees for about 25 minutes.

Then ruin your diet and go eat WAY too much!
Canning Cabbage
They had several heads of cabbage marked down at the store this weekend. I got two. Phil and I LOVE cabbage.
 We still have several jars of sauerkraut so I went looking for instructions on how to just can plain cabbage. Not in my Ball book, not in my Better Homes and Gardens canning book, but it was in my Stocking Up III book (I only had one other canning book to go to and that was Putting Food By). Anyway, what you are supposed to do is take off the outer leaves that aren't good, cut the cabbage and cut out the core, then cut it up in smaller section. Put it all in a LARGE pan to boil.


I added a small onion and a few hot peppers.

You want to let it boil until it is no longer stiff but still kind of rubbery. Maybe 15 minutes(I didn't really keep track of the time). You are then going to put it in your jars. One thing I want to mention here is that you really have to work to get all the air bubbles out of the jars. Then pressure can for 25 minutes at 10 lbs pressure. I got 6 quarts out of these two heads of cabbage.

Canning Summer Squash
This week they had summer squash and cabbage on sale at the store (the cabbage post will come later). Phil and I like our summer squash just plain boiled with butter on it. I know very plain but that is how we like it. (Michelle and I also like dehydrated zucchini dipped in Ranch dressing and eaten for a snack). I decided to try canning this squash. I have never canned summer squash before just winter squash but you can buy cans of yellow squash in the stores here so I knew I could can it at home.


I washed, cut the ends off, and cut the squash up in chunks then put it in a pan and brought it to a boil. I cut some of these in half after I took this picture when I realized they'd be too big.

I put the squash in the jars adding enough of the liquid to leave 1/2 inch headspace, added a half teaspoon of sea salt and pressure canned them for 25 minutes at 10 lbs pressure.

I ended up with 9 pints from just those two packages of squash. I kind of wish I had bought more and next time I will add an onion in with it not sure why I didn't think of that this time. What is summer squash without onion?
Lemon-Limeade
So I was thirsty while I was canning today and decided to try the dried lemons and limes to see if I could make a nice drink out of it. I had seen two different ways to do it on different sites online. One involved putting the dried lemons/limes in a pan and bringing them to boil then putting them in your pitcher and adding the sugar and ice. The other put the dried lemons/limes right in the cold ice water in the pitcher. It seemed to me that you would get more taste if you boiled them so that is the method that I tried today.


I am not sure how many this would be. It was just a small jar of lemons and limes. I brought these to just a boil. I would suggest that you strain the liquid out next. I didn't and then had to pour it out of the pitcher and strain it.
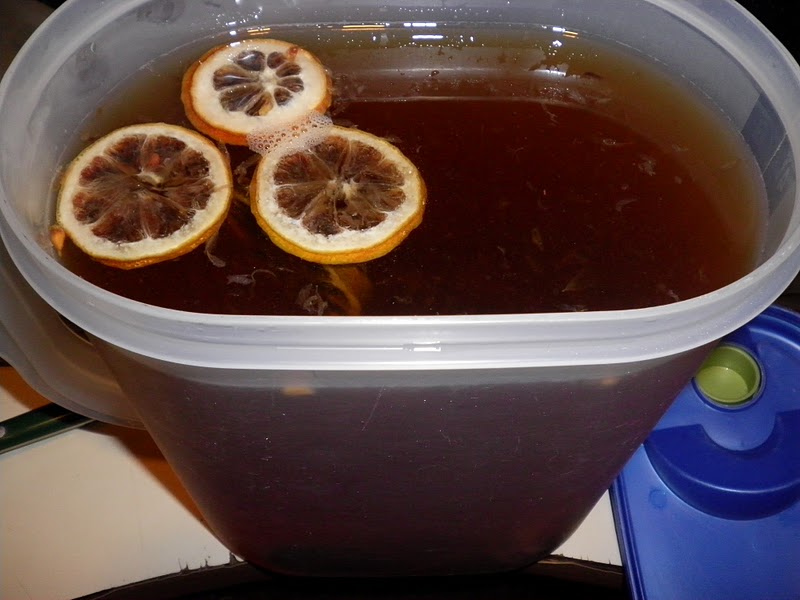
Add your sugar and add ice. That is all there is to it.

But, how did it taste? It was strong. The limes were stronger than the lemons and it wasn't very tart at all. I believe I will try the other method where you just put the dried fruit in the ice water and I will separate the lemons and limes and see how it goes. As for this pitcher, it is still getting drank. I added more ice which made it not so strong and I added some bottled lemon juice which helped as well. I will still be on the lookout for marked down lemons so that I can keep a good amount of dried lemons stored.
Sunday, September 11, 2011
Raised Beds


I'll put the compost from the compost bin in these and I also will be cleaning out the pens and bringing that waste down to fill them with throughout the winter and hopefully by summer I'll add a bag or two of manure and we'll be ready to plant.
Monday, September 5, 2011
I Made Some Pumpkins!
Thanks to Egretta Wells Cottage Creative Living, I made some fabric pumpkins today. They were pretty easy. The picture makes them look kind of pinkish but the fabric is really orange. I wish I had had some patterned fabric that had orange in it but couldn't find any in my stash. Thanks again Egretta!


Sunday, September 4, 2011


Saturday, September 3, 2011
Norwegian Jaerhon

I hatched these two little beauties yesterday. I think these are the pretties chicks! These are Norwegian Jaerhon chicks. These are the only true Norwegian breed. The originated from a Norwegian landrace type of chicken. The national control station for breeding was established in Jaeren in 1916. It is said that the breed originated from one single pair of parents, however they have good vitality are are doing fairly well as a breed today. Roosters and hens look quite different as the hens have a set pattern to them but the roos look like a mixed barred chicken. I have read that you can sex the day old chicks by their color. Since mine look the same I take it they are either roos or hens but I don't know which one. These will not be meat birds here (unless they turn out to be roos and I can't get any hens for them) but will go into the layer flock.
Subscribe to:
Posts (Atom)